3 Yoga Poses For A Healthier Pelvis

In this article, we’ll show you the best yoga poses for a healthier pelvis. They are all very easy to perform. Moreover, you could already see results within a week. Try them out!
Many women complain about pelvic pain. In general, the muscles in the pelvic region usually weaken due to:
- pregnancy
- injuries
- in the absence of physical activity
So remember that if you want long-term results, it’s important to get regular exercise.
Some notes beforehand
If you want a healthier pelvis, you also have to take into account certain important aspects. Remember, it is best to contact your doctor if you have any questions or concerns.
- If you had surgery in your pelvic area less than 6 months ago, talk to your doctor before doing any of these exercises.
- Yoga poses should feel comfortable and should never cause pain. As soon as you feel uncomfortable, slow down a bit.
- Start with 2 or 3 sets of the yoga poses. You can increase the number of sets as the exercises get better.
- Take your time to perform each exercise correctly. If you try to speed up the process, you could accidentally injure yourself.
Try these yoga poses for a healthier pelvis
1. Curved Hand-to-Toe Extension
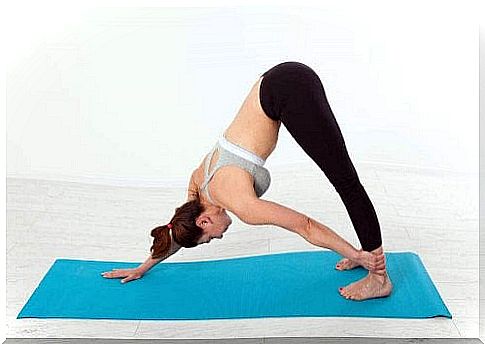
This pose can strengthen your legs as well as your pelvis. However, avoid this pose if you often suffer from chronic headaches or low blood pressure.
- Stand with feet about 8 inches apart. Keeping your legs completely straight, gradually bend forward and inhale deeply to ease the movement.
- If you are flexible enough, bend until your hands touch your toes. If that doesn’t work, just grab your ankles.
- When your hands reach your feet, touch your big toe and count to 10 slowly, or wait 30 seconds.
- Move up slowly once the time is up, then exhale slowly. Repeat this movement 3 times.
2. Bridge Pose
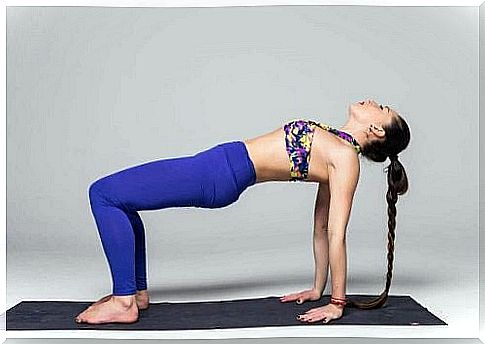
This pose can strengthen your pelvis and tone your muscles. It can also stimulate your blood circulation. However, we recommend that you avoid this pose if you have injuries to your neck, arms or ankles.
Carefully follow the following steps:
- Lie on the mat with your arms flat on the floor.
- Take a deep breath. Bend your knees until your heels are in the position where your knees were before. You know you’re in the right position when you can touch your heels with your arms outstretched. If so, spread your feet slightly.
- Your hands should be far from your body. Straighten your back, place your hands on the mat and exhale.
- Raise your hip until you form a straight line between your knee and shoulder as you inhale deeply.
- Place your arms under your body and fold your fingers.
- Raise your hips as high as possible. Keep the balls of your feet on the mat and hold this position for 15 seconds.
- Repeat this exercise 3 times and take a 10-second rest between each set.
3. Mountain Pose
This pose is perfect for getting a healthier pelvis. It is a very easy exercise that you can repeat throughout the day. If you take this pose regularly, you may notice a significant improvement within a few weeks.
This exercise can also help you become more flexible and improve your posture. In addition, the mountain pose can help relieve your lower back pain. This is also a good exercise for at the end of your workout. This way you can let your muscles relax and unwind.
Follow these steps:
- Stand as upright as you can on your mat. Your head should be raised slightly, with your lower jaw parallel to the mat and your neck extended.
- Take a deep breath. Put your legs and feet together, press them together and bend forward.
- Relax your body a little and separate your fingers. Put your legs back together and relax.
- Distribute your weight evenly on both legs. Draw in your lower abdomen and slowly move up.
- Spread your arms by your sides and keep your palms on the sides of your thighs.
- Place your fingers together and point them down. Then straighten your back without lifting your shoulders.
- Hold the pose for 30 seconds.
- Repeat this exercise 3 times and take a 20 second rest between each set.
This yoga pose does not normally pose any health risks. However, you should stop immediately if you feel any dizziness or other discomfort. In general, you will not experience any problems as long as you stay on your feet. However, if you suffer from anemia, it can cause dizziness.
Maintain a healthier pelvis by practicing yoga regularly
As you may have noticed, these exercises are quite easy to perform. If you don’t have any serious health problems, you can do them every day. This is a good start if you haven’t exercised in a long time and you want a healthier pelvis. You can also try other poses or do more exercise.